Community Centre 3D printed: Part 3/4.
No more tech talk for this project! Assembly pics, yay!
I had a few days delay in printing, as I had to print parts for hub as well, it has been warm and a printer does give off some heat, plus we had stuff to do away from home, and I never print when I am not present. And, I was inspired to print extra items, lol. You know me by know! Could not resist, bwahahahah!
Almost done printing as we speak, time to finish decorating the lot, take pics, make videos and compile it all into 1 storyline vid. Part of the vid is already made as well.
Finding the right tree color in a decent PLA filament was a challenge. It had to look a bit like oak, and fit my existing Sylvanian forest. There are PLA's available with actual wood components, but they smell of burnt wood during printing, which I did not want inside my house.
As far as the activity
centers on the platforms, I had enough colors to pick and choose from to print
from various brands. I went for candy colors and metal tones.
Almost everything is 3D printed in the design, but I did add some resin glow in the dark mushrooms. PLA filament to print exists in varied glow in the dark colors, but it's very abrasive to the printer's nozzle, so I don't use that, as replacing a nozzle in my printer is very hard to do.
3D printed parts were glued together with super glue, UHU Model Kit for permanent sturdy fixings in where the glue never shows as it turns a bit yellow, or Pattex Multi. The UHU allows a brief period on adjusting into place, longer than superglue, but still fast enough to avoid struggling. I used Pattex Special for plastic in the past, this one is even better, as it settles faster.
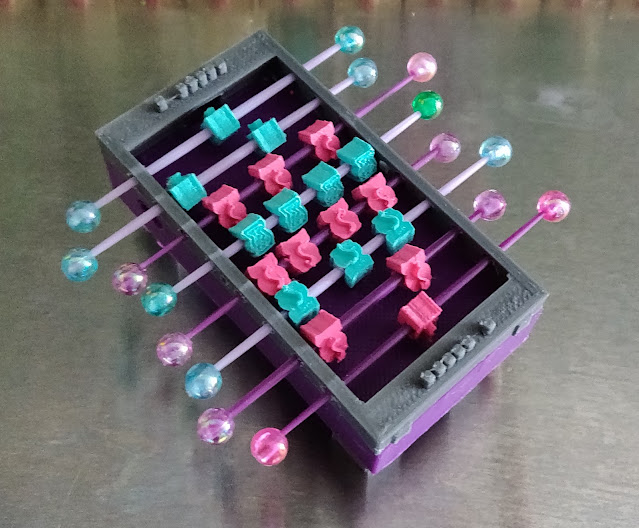
Here's one of the tiny objects I printed: a foosball! By the way, the actual "ball" is a printed ball of yarn, thought that would fit the cat theme of it. The sticks are made from toothpicks, the handles from beads.
A 3 foot tall tree has to be
bottom heavy not to topple over, even if it has a wide base. You can up the
infill of the print, but that adds drastically to the printing time and
filament is costly. I never print at night due to safety reasons. Instead, I
bought marbles for the tree root parts, and used pebbles and stones I had lying around
as well. I cut parts open in MeshMixer, printed the “lid” separately, filled the part up and glued the "box" shut permanently.
The acrylic base at the root was covered
with artificial moss to make it look real. Glue was rubbed on with a disposable hair dye brush, moss sprinkled over and pushed on by hand. Excess was removed after it dried with a brush. It even goes up the base of the roots a little, to make it look more realistic. I used different types of moss deliberately.
Each platform has an activity center on top, but they can come off, they are not glued, except one because of how it is constructed, so it would be easier to the move the tree around.
The staircases, made from platforms, stairs and L-shaped stairs, were glued onto the tree and platforms. Small clamp tools came in handy to do this part.
Time to glue the canopies on and let them dry till the next day. Then the mushroom activity centers' platforms were glued on top. As always, everything was fitted well before using permanent glue. In my case, a serious dimensional inaccuracy height wise, not in width, caused me to swap platforms and redoing all the staircases I had planned. I also had to adapt sone canopies because of it.
Once assembled, I was inspired for more activities or extra details. I went hunting for printable files and printed some more stuff to make it more interesting.
Sometimes, a design does not always work out. This entire tree is created from tweaking existing printable models. It can go from minor changes, to elaborate ones. I created a lovely roof, but none of my computers here was strong enough to slice it, meaning calculate what the printer has to do with it and turn it into a file. Bummer! Not even our best gaming PC could cope with doing the job! Here's a printscreen of the design. It was an oak leaves rooftop with an acorn shell at the top.
There is a trolley cart on the tree. I just could have made a simple "pull me up", but the tech geek in me could not resist to take it a step further. But, how far would I take it?
I actually could have added an empty chamber in the tree, installed a tiny motor with batteries, closed it off with a clickable lid. I could also have connected the steering wheels with gears, switches, wires, to make it work by hand. But, as I don't need details like that for myself, I just constructed it as if it could work if I had wanted to, but no parts hidden inside the tree.
I can make the main parts move by hand, that suffices. Not that I would besides for taking pics, but the satisfaction of the possibility is all I needed. Here's a sketch. On the left is how it looks, on the right are arrows on hos the wheels turn, or the cables turn, and they can reverse direction.
The only regret I have, is that I did not design the tree 4 feet high instead of 3,3!! When I ever move from here, I actually will rescale the entire design, improve it and print everything again. My next printer will have a larger print volume, so the tree can be cut in much bigger chunks to print. To deal with the dimensional inaccuracies, I will attach all staircases, platforms and canopies in the design to print in one go.
Multicolor prints are possible now, the printer just swaps filament when needed. You actually color parts in the software to do so. This will be much sturdier too. New printers print at least 3 times faster, as they have completely different technology, so printing bigger parts will be easy as pie.
Keep your eyes peeled for the next blog, next weekend! Hope you enjoyed the journey so far!

.jpg)
.jpg)
.jpg)

.jpg)
.jpg)
.jpg)
.jpg)
.jpg)
.jpg)


.jpg)

Comments
Post a Comment