These are the original figurines from the series. I did give them all shoes, as only the original ballerinas were wearing ballerina flats. None of the others were intended to wear shoes, but that's something I always do, to make them stand better.
Angelina birthday set. This is very hard to find.
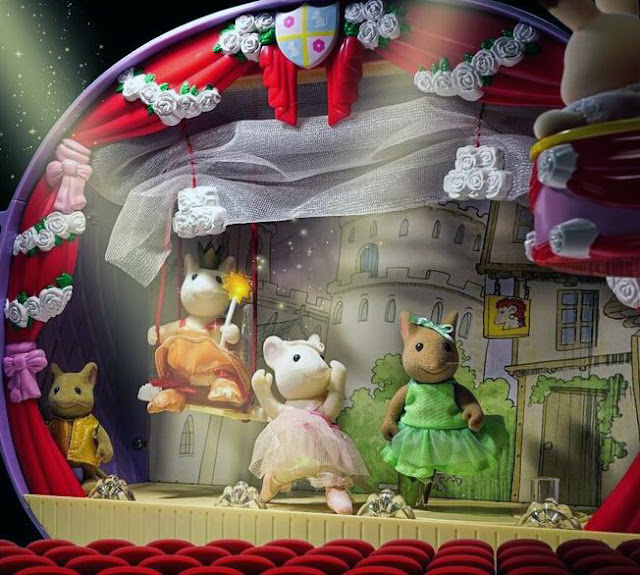
This is the Calico Critters Katie Kitty ballerina.
Britney Ballerina holding another of her dresses.
Some of them got some fixes to restore them. The wings were curled up and noting I tried seemed to fix it. This seemed to happen to all of them over time.
So I added a thin plexi at the back to make them stand correctly again.
And the wand received a star again at the top.
The original necklace was missing, but I had a Sylvanian one which replaced it well, on the right.
Some figurines were dressed extra. I can't stand the idea of private parts getting too cold, rofl, so Henry got trousers and Quaver got a dress under her scarf.
Polly is sold completely naked in the original set, although she is dressed in the original illustrations. I gave her a Sylvanian baby dress.
I had various figurines double. I redressed them all. Here are some examples, you will find more further down too though.
The prince on the right.
I thought I would never find an intact Angelina in winter outfit, so I created one. Hat and scarf were handmade, the dress was Sylvanian. Once I found the real one, I think I did a nice job comparing both. My fake one is on the right.
I even found a bike which looked a lot like the one of the birthday set. I dressed it up like the original one.
Here are both Angelinas in front of the cottage.
The pram had a broken handle. As my 3D printer was too stubborn to print a tiny part, Fimo clay was used to make a copy and it was colored with nail polish to make it golden.
Cheddar cottage was furbished with the original stuff, but I added some extras: a bathroom, drapes, fridge, living room and some flowers.
It's such a cute house!
At the time, it took some work to create a 3D print from a picture, but these days, AI can be used to do that fairly simple. I created a 3D print of the cottage sign manually, which I was missing.
The original carry-on theatre only represented a stage. I was set on creating a full sized theatre! A wooden theatre was built and items 3D printed.
Since this purchase came unexpected and could use extensive crafting, I decided to go completely overboard on this. I grew up watching a gazillion of old Hollywood movies, and loved the splendor of old theaters. I gave it a whiff of Art Deco. There is plenty of Art Deco where I live, most of it looks stunning.
I made a complete theatre plan in my head at night, during waking hours. No need to put it on paper, I seem to have a decent brain lobe somewhere for storing ideas visually, lol.
It mostly needed a few multiplex boards, wood glue, a pencil, eraser, jigsaw cutter, spray paint, buy some surplus Sylvanian items and add some 3D prints.
To fill the huge theatre up, I decided to add a cat of every type of Sylvanian which was released. For the purpose of taking pictures, I did add some spare cats though. Eventually, over the upcoming years, I am pretty confident that those will be filled with 1 of each newly released cats, lol.
Over the years, I had gathered plenty of identical Sylvanian chairs, because I loved these most and figured I would use them for a big gathering one day. I found a stash of manufacturing discard chairs, to add even more, with only a minor color difference, but that's no issue for me at all.
I started with a multiplex base to support the whole lot. I placed the stages and orchestra first and outlined the levels they would be on.
Then I started drawing the crowd area as a draft. I had decided upfront to go for an auditorium style design, meaning curved levels.
I had to contemplate about the foyer's staircase. Either a wide one at the base splitting into a double one for the landing, or a double curved one starting from the base. Since I also had to have room for a snack stand, vestibule, backstage and toilets, a double staircase turned out to offer the best space available after shuffling the miniatures around a bit. I could not plan ahead till I had all the furniture to fill those areas up delivered, as I had no clue how big some furniture turned out to be.
Here is the basic public seating area on the left below. On the right, the balcony level. I drew the front edge of the balcony first and went on from arranging the sofas and chairs next.
The crowd levels are each identical in floor base shape, only the top one has a different backside for the staircase's landings. All downstairs levels were cut and placed to check if it the design was OK. Each level sticks a bit out at the back, so the next level can be glued on the overlap. The exact position of the overlap was measured and drawn with a pencil, so it was easy to glue into place.
I was happy with how it looked, so the edges were filed with a metal file, levels glued on one by one, letting each level dry before adding the next. Small wooden blocks are glued under each level on the left and right, so it has a support underneath. The wood express glue takes 2 hours to dry, I took 2.5 hours to be on the safe side.
The height of the balcony was determined by spanning a ribbon from the top of the theatre's stage over an adult cat's head at the back of the levels. Marking the front of the balcony on the ribbon, measuring from that point down to the wooden base, gave me the pillars' height. This gives the optical illusion that even spectators at the back could see the show standing.
The pillars for the balcony were created from pieces of wood glued together. They were also glued in the correct position at the base.
The easiest way to design a staircase without pretending or needing to be an architect, is to work with circles. They can be shoved around till the design pleases you, by stacking similar height items under each step so it stays upright. It still had to be "functional", because it twists and turns in a quirky was as Art Deco staircases often do, so it would be possible for a Sylvanian walk over it without bumping their head. And, it has to start and land in the correct spot. Planning the stairs way of twisting was something I did also did during waking hours in my mind.
Since our jigsaw cutter was really too crappy to cut small circles, I thought about 3D printing them, but it was much cheaper to go for wooden ones from Amazon. Those came rounded at the top, a nice looking bonus. Here is a pic mid process of stacking and gluing simultaneously, to create symmetry.
After painting them, there was some support added underneath, not to break a part off.
The balcony has a front and back part. The front is the landing, the back is where the audience sits. Wood was cut, filed, glued, left to dry. The base is a thin multiplex wood, to reduce its total weight.
All upright walls were also glued into their spot. Since our jigsaw cutter was working so-so, not exactly a decent tool to do this type of detailed cutting, and impossible to cut real straight lines, small wooden gaps had to be filled with wood paste after.
Before I even had bought the multiplex wood, I started to 3D print several items to decorate the setting. The filament for it is called PLA, it's a plastic. Yet, the staircase's railings I designed were printed with TPU, a flexible plastic. Since the railings are long, they need to be glued together with superglue. Once glued together, it was placed in a curvy way and held into place with clips till the glue dried.
Then it was painted, as TPU only comes in a few basic colors and I needed copper instead of skin color.
All the 3D printing went on for many weeks, even weeks after the woodwork was done. It took a lot of patience to 3D print, but oh, so worth doing so! I absorbed ideas from pictures I found online, from the ballet threatre's balcony drawings, and stuff that bubbled up inside my brain. Waking hours ... they never fail to be useful! I have found a new treasure of miniatures in 3D printing!
Here is a detail I picked from the theatre's balcony wall, for example, compare it to the original below.
I loved this drawing and managed to create a 3D design from it, again manually, as that was the only way back then.
I stuck it in the middle of my back wall. Note the 3D printed spotlights, with actual lights inside.
This was a 3D design I made to serve as wall lights' covers. I printed the colored base onto an overhead transparent plastic. Flowers are very Art Deco.
The theatre's entrance top front embellishments were made from dead cheap "under the desk drawers", meaning small drawers which could be stuck with adhesive tape. Cutting an opening with a Dremel like tool is kinda hard, because of not having great accurate control handling a tool like that, it's easy to cut too far or ruin the material as it is hard to keep in line. This material is semi-soft, it would leave permanent marks easily. Instead, the openings were melted out with a soldering tool, under a cooking vent, as the fumes are toxic. Staying within the lines makes it possible to carefully remove the excess later, with plexi cutters, a fine electrical wire cutter and filing with a metal file after. It's a necessity, as the melting is not neat and tidy either, but at least better controllable than a cutter.
The balcony sofas were spray painted to fit better color wise. Red was turned into fuchsia. I found them as manufactory leftovers as well.
4 battery operated LED fairy light strings were woven through the holes, with their switches hidden from sight, yet easily accessible. The weaving was done by using a thin crochet needle. The strings are replaceable if they should fail. The balcony has its own set, so that the entire balcony remains fully removable and did not have to be glued onto the pillars. This offers easy access below if needed.
The bottom of the base of the lot has the leftover steps glued to them, so the entire structure does not rest on a flat bottom, but has round "feet", creating space for controlling the LED light switches and tucking the LED string cables out of sight. Holes were drilled for LED's. Some LED cables are held into place with some tape where you can't see it, like at the bottom for example.
The front wall is double, so the light string could be replaced easier as well and remains hidden.
The balcony got tiny 3D printed cable guides underneath to have some control over the LED string going all over the place.
I ended up buying 3 theaters in the process, to gather all the figurines, as that's how sellers sold it on Ebay. A theatre broke during transport, it was dismantled and some parts were used in the setup: a second stage in front, the plastic curtains as drapes on the balcony were cut into pieces, a spare set of fabric curtains, and the door panels aka balconies connected to the existing ones. Yet, even though hub loved that idea, he hated the difference in color of these in comparison to the others. They were UV faded, and the difference was huge:
So, they were painted with the color used for the floors at the bottom level of the theatre. Much better! Hub was pleased, lol.
The chosen colors complement the Angelina Threatre set. Pieces of the original walls, like the doorframes and the flying mice, pop up on 3 walls. And, you know me, I like cheeky additions, I am pretty sure you will spot them here and there.
The adult mice needed shoes. I was not that well skilled in tweaking 3D designs just yet at first, so created PU fake leather slippers instead. I bet some BJD doll shoes would fit, but those are rather pricy. My own resin shoe molds are not that big either to make some.
Slippers are dead easy to make. I used PU leather and fluffy fleece. I drew around a foot, so I had a template. I created double slabs, with a rim tucked in between them.
I used a multi-purpose glue which remains a bit flexible after it dried, called UHU Poly Max, to slick both sole slabs together, with the top rim in between. Once that the glue was dried well after 24 hours, the rims were tidied with scissors and a small resin flower was added on top. That glue stays semi flexible after it dries, so it's perfect for PU leather, as it doesn't crack being handled and can be trimmed off easily. I added some embellishments on some of them.
I did tweak a design and 3D printed shoes to fit the large mice later on. See the adult male mice here:
The male child is wearing resin shoes. See here on how to make those:
I absolutely adore the entire series and what I created inspired by it!
Unfortunately, since we have to move in a few years from now to a better climate, the wooden theatre won't survive the long trip. I plan on 3D printing one this time and it will look even better than the current one. The original pieces can be tagged along, of course, only the wooden creation will be tossed.
But, for now, Me and you can enjoy the vid with a story I created, an it has a little twist near the end. Enjoy!
Again, a compilation about a series of blogs I made about this topic, after extensive research, compiled to offer relevant data only, and improved it even a bit. I split all the data over 2 blogs. I discovered the Angelina series in 2021 after I already collected a lot of Sylvanian Families and fell in love with them instantly. You can see the likeness to Sylvanian, but they are not real ones. Yet, they do are related indeed, as you will find out! T his is blog will deep dive into the origins, the next blog about my crafting. Flair (UK toy company since 1999) took over the production of Sylvanian Families in the UK in 1999/2000. Up to then, Epoch only produced Sylvanian Families in Japan. In 2013, Flair transferred the rights for the UK toys to Epoch UK. Flair released the Angelina Ballerina sets starting from 2003, yet claims to have no more info on the series, after contacting them. Through the help of some members of the Sylvanian forum, and lots of online research, I gathered more ...
My diorama setup for after we move in a few years is already planned. It's done in a way that I can do a straight line, an L of U shape, or even divide it up in 2 or 3 pieces. I had a small spot in the Town part that was empty. I have stuff to put in it, but those are single items that I can put elsewhere. I was hoping to get an idea to print something for it. But no more stores, and it had to fit in the theme, yet be different. Then I spotted a new 3D print design from Fulv, who offers affordable designs: a tram station! I already have a Sylvanian tram stop sign, trams, lanterns, and park benches and that would just complete this perfectly at the other end of JollyOaksField town. It had to be adapted to fit in my empty spot. I also swapped parts with one of Fulv's previous designs, like the flowers and rooftop ornament grids. I spent a few days adapting his models to fit my needs. His tram got sliced up and altered to become a pram tram, inspired by the Sylvania...
My Google account offered me free use of Nano Banana Pro AI, so I instantly put it to good use. Please comment on my blog which families you would like to see yourself in future, and which ones of my suggestions would you certainly buy if they were available. Enjoy! Let's hope Epoch will actually see this and become inspired! Platypus Hippo Zebra Dolphin Butterfly Turtle


.jpg)
.jpg)
.jpg)


.jpg)

.jpg)
.jpg)
.jpg)
.jpg)


.jpg)
.jpg)
.jpg)
.jpg)


.jpg)

Comments
Post a Comment